Ultimate Guide To Running Amazon PPC to Grow Your eCommerce Business
Amazon Sponsored Product Ads also known as PPC (Pay-Per-Click) plays an important role when it comes to growing your Amazon business especially in today’s highly competitive Amazon marketplace. Sellers need to stand out from the crowd and fight for placements in order to gain visibility from potential customers to generate sales.
Apart from that, sellers need reviews in order to generate sales but they also need sales in order to generate reviews. Without incentivized reviews, how can sellers trigger this cycle? This is where Amazon Sponsored Products ads come into play.
How can you utilize Sponsored Product Ads to build your Amazon eCommerce business? Here are three main benefits you reaped from running PPC.
- The most crucial time to use PPC is when you launch new products to the marketplace. Sponsored product ads help increase visibility among potential customers so you can start selling, make a profit, and also start getting reviews in.
- Running sponsored ads help attract and acquire new customers for your business. This amazing tool will help sellers like yourself acquire new customers thus building your brand and audience.
- Sponsored product ads can also help boost product sales and BSR (Best Seller Rankings). As your sales increase through Sponsored Product Ads, so do your rankings. These will help increase your organic search ability and you’ll be able to leverage on this.
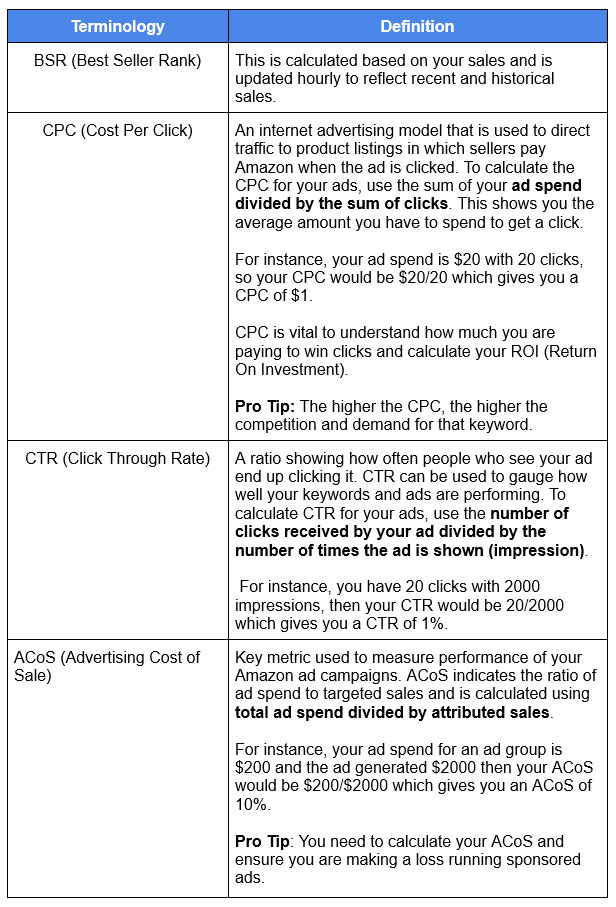
Here’s a table of terminologies used throughout this article,
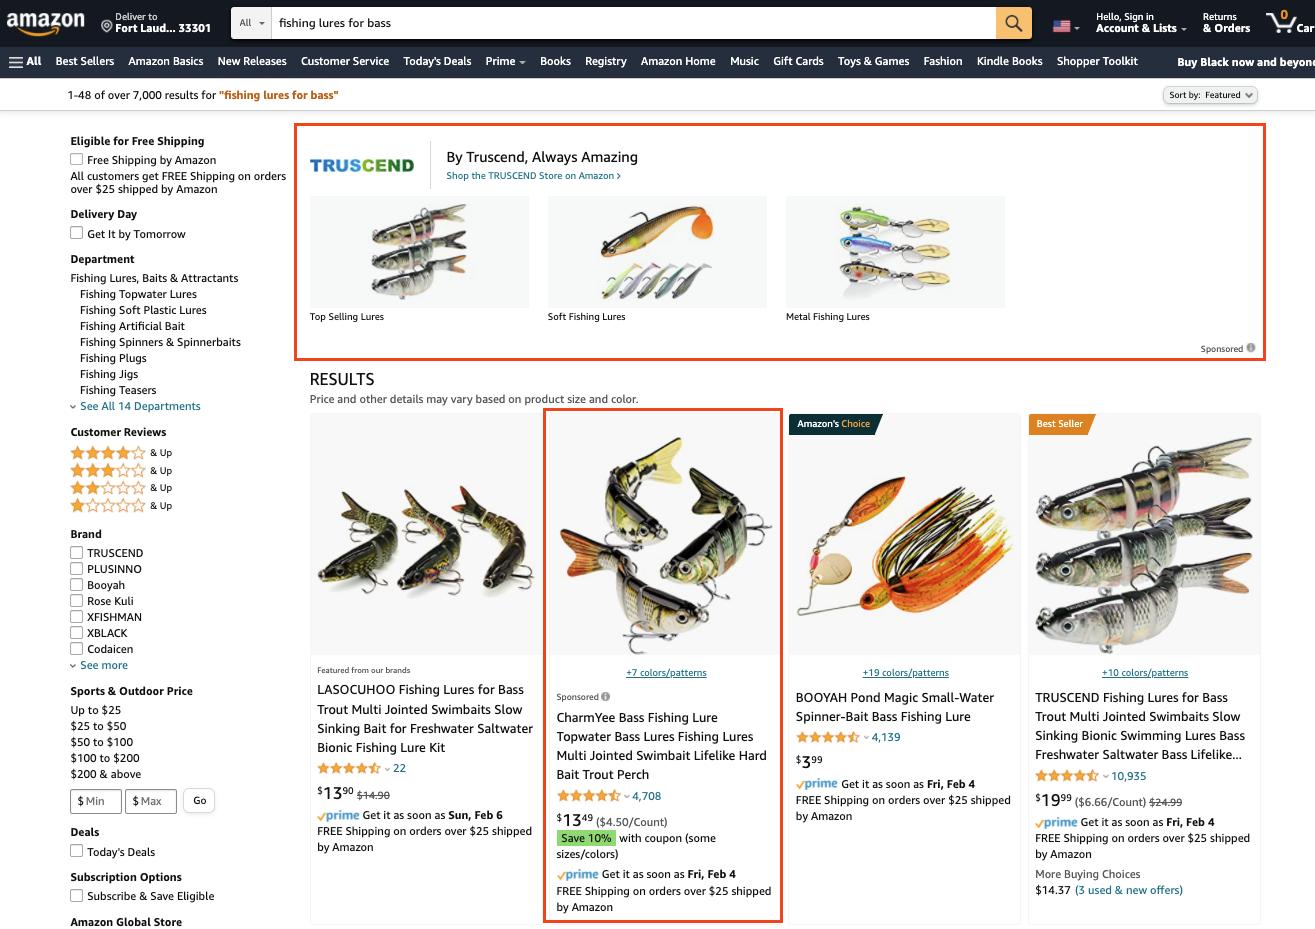
Sponsored Products Ads Examples
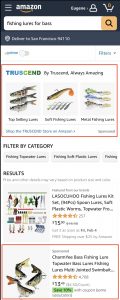
Below are a few examples of Amazon sponsored product ads shown on desktop and also mobile.
Amazon Sponsored Ads Shown On Search Results Page,
Amazon Sponsored Ads Shown On Competitor’s Product Listing,
Amazon Sponsored Ads Shown On Mobile,
Amazon Sponsored Ads Components
Now, before you start setting up any ad campaigns, you first need to know components that define a campaign and understand how to structure a good campaign so you can manage your campaigns efficiently. The following image explains the structure of a good ad campaign.
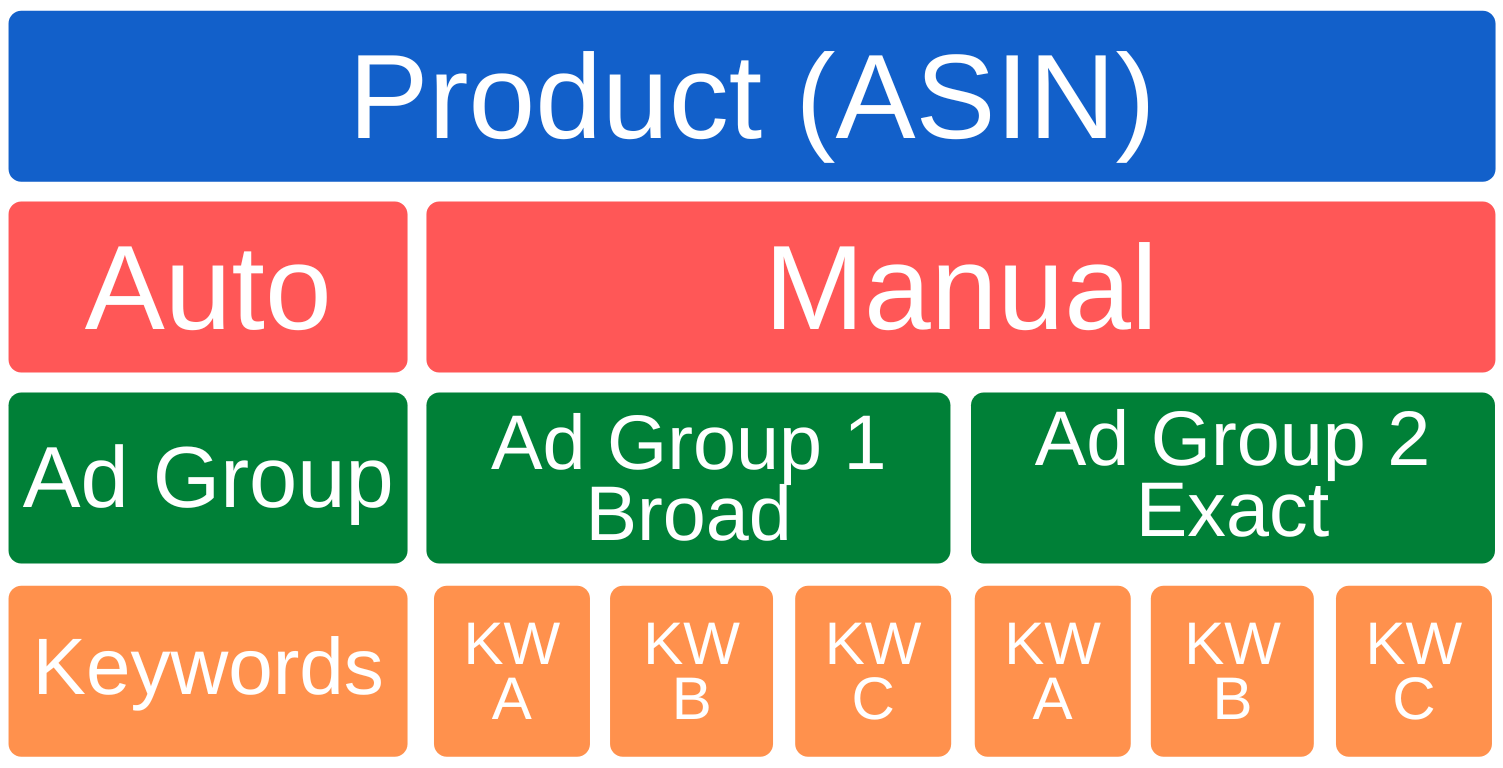
Basically, you will have ONLY two campaigns running for each product; one automatic targeting and the other manual targeting. There’s only one ad group running for auto targeting ads as all keywords are, you guessed it right, generated automatically by Amazon.
For each manual targeting campaign, you need to create three ad groups for each keyword match type, specifically broad, phrase, and exact match types. And for each match type, you want to have all your keywords listed here. I will detail each component for a sponsored ad campaign so you have a better understanding.
Automatic Targeting Campaign
For automatic targeting campaigns, Amazon’s algorithm selects keywords based on your listing content and competitor product listings. It’s quick and easy to set up an automatic targeting campaign but the downside is that you have less control of keywords to target. Keywords selected by Amazon for automatic targeting can be irrelevant and questionable at times hence it’s vital to add negative keywords to your campaign. Negative keywords is like a blacklist so keywords listed in it will not be bid on. Keep in mind that clicks without conversion will only lead to wasted ad spend hence I emphasized the importance of adding negative keywords.
Manual Targeting Campaign
As for the manual targeting campaign, you will need to manually insert keywords to be used for bidding. There are three types of keyword match you can select from and need to create all three within each keyword categories,
- Broad Match – The keyword can match a shopper’s search terms in any order along with other close variants of your keyword.
- Phrase Match – The keyword can match with shopper’s search terms that consist of additional words before or after it, minor misspellings, and plurals.
- Exact Match – The keyword has to match shopper’s search terms exactly without any other terms in the search; only minor misspellings and plurals are allowed.
Keyword Bidding
Just like any other PPC platforms, Amazon Sponsored Products ads will charge you for a click regardless of whether or not the shopper purchases your advertised products.
So how does keyword bidding work? Basically, Amazon sellers will try to outbid each other to gain ad placement and visibility that might lead to a click and subsequently a sales conversion. A bid is the maximum dollar amount you are willing to spend per ad click and most of the time the amount charged is slightly lower than your bid.
When creating a new ad campaign, Amazon will assist you with a suggested bid.
Suggested bid is the dollar amount recommended based on the number of competitors and their bids for a keyword, in order to win the ad auction.
Some of you might have noticed the Amazon Bid+ checkbox when creating your ad campaign. When enabled, Bid+ will automatically raise your default campaign or ad group bids up to 50% and ads won using Bid+ will be displayed in the top row of the search results page. Keep in mind that your average CPC will increase when using Bid+ but your daily budget won’t increase as that is fixed until you change it. Keep in mind that you need to take into action usage of Bid+ when setting your daily budget so you don’t run out of budget in a short period of time.
3-Step Process to Creating a Successful Ad Campaign
By now, you should have a better understanding of how Amazon Sponsored Products ads work and all the nitty gritty. Let’s start implementing what you have learned to create a successful ad campaign.
Step 1 – Insert Daily Budget, Select Ad Targeting Type & Bidding Strategy

Firstly, you need to insert a campaign name and I suggest using the format ‘Product + Ad Targeting Type + Bid’ for ease of ad management. For instance if you are selling fishing lures then you can name it ‘Fishing lures Auto Targeting $0.75’. Creating a portfolio for each product also helps with ease of management.
Next, you need to insert a daily budget for the campaign and you need to have a minimum of $1 to get started. I suggest having your daily budget based on the amount of keywords you have and the optimal starting bid. For instance if you have a total of 30 keywords and the starting keyword bid for each keyword is $0.50 then your daily budget would have to be at least $0.50 x 30 = $15. This will allow Amazon’s algorithm to display your ads in a more efficient and effective manner.
Select a targeting type for the campaign and choose your campaign bidding strategy. There are 3 types of bidding strategy to choose from as shown below,

It is recommended that you opt for the “Dynamic bids – down only” in the beginning as you don’t want Amazon to chew up your budget by increasing your bid by a maximum of 100%. Once your conversion rate has increased above the average rate of 10% then you could switch to “Dynamic bids – up and down”.
Pro Tip: For “Fixed bids”, you can opt for this when you are creating a manual campaign using converted keywords from your search term reports. Knowing the CPC for converted keywords allows you to have more control of the bids hence fixing the bid at a certain amount.
Step 2 – Create Ad Group & Select Product(s) to Advertise

Next step is to insert your ad group name. Similarly, you’d want to name each ad group based on keyword and match type. Next, select the product you want to advertise either by searching for it, enter the list of ASINs or upload it.
Pro Tip: For ease of management, be as specific as possible when naming your ad group.
Step 3 – Insert Keyword Targeting, Bid and Negative Keyword Targeting

The third step is to select your targeting type and in this case, we are going for keyword targeting. I’d suggest providing your own keywords instead of using suggested keywords by Amazon. There are plenty of online keyword research tools to use such as Keywords on Fire which is my favorite. Insert your keywords and select the targeting type (broad and exact) for the ad group. Remember to check your keyword bids as the algorithm will by default set them to the average bid other advertisers are using.
Pro Tip: Ideally, you want to create both Automatic and Manual targeting for each product. Amazon A10 algorithm will run more efficiently when you have both targeting types plus you get keyword ideas looking at the Automatic targeting campaign in the search term report.
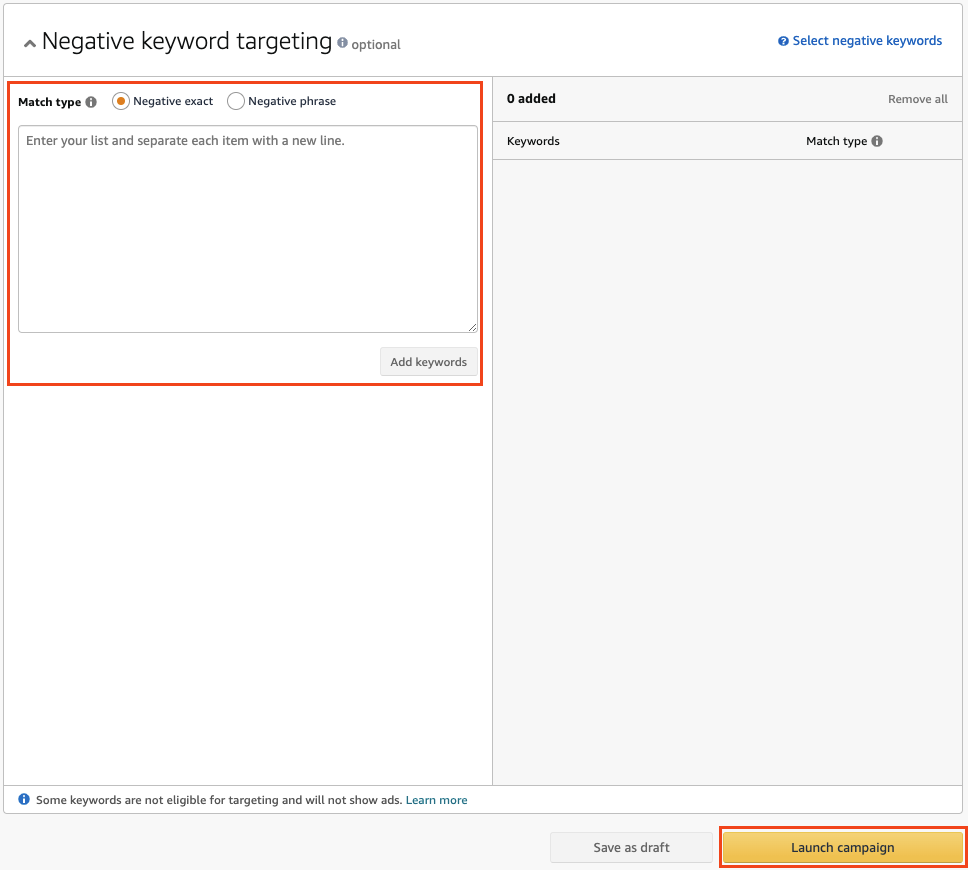
For the negative keyword targeting section, leave it blank if you just started running ads for the product unless you have previous data on keywords that you don’t want to target.
Let your campaigns run for about a week without making any adjustments allowing the algorithm to work its way through. Keep in mind that it takes around 24-72 hours for Amazon to report and update the data.
Utilizing The Amazon Search Term Report
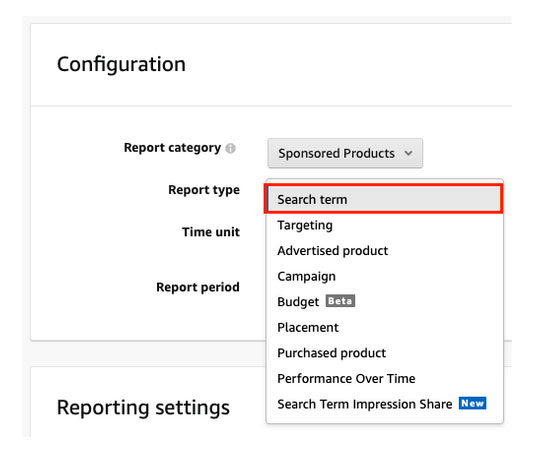
It is important to keep track and optimize your ad campaigns for better delivery and ultimately sales conversion. Remember the negative keywords I mentioned above? This is where you can identify negative keywords for your automatic targeting campaign.
Once you have identified the list of negative keywords and compiled them, upload them onto the ad group negative keywords list for the automatic targeting campaign. Just by doing this, you will eliminate a lot of irrelevant clicks that will chew through your ad budget. Amazon will also reward you with better impressions and lower CPC for providing useful data to the algorithm.
How to Calculate Your Ideal ACoS?
Here are the information you will need to know in order to understand what number works for you so you don’t make a loss:
- Cost of Goods (i.e. $8)
- Product Selling Price (i.e. $26)
- FBA Fees (Picking & Packing, 15% Amazon selling fees, order handling fees, and monthly storage fees. I.e. $8)
- Miscellaneous costs (shipping, labeling, etc. i.e.$2)
Using the product selling price and minus cost, FBA fees, and miscellaneous costs:
- $26 – 8 – 8 – 2 = $8
You know that with the $8 profit per unit sold, you can still spend up to $8 to get a sale and still be profitable. To calculate the ACoS threshold for your break-even point, simply divide the net profit from the selling price ($8/$26 = 0.31). This means that you have a 31% ACoS threshold and you will still be profitable on any campaigns that have an ACoS of 31% or less.
Final Thoughts
If you haven’t started running your ad campaign, now would be great to put that knowledge into practice, especially if you want to prosper from the upcoming holiday season. It’s important to plan ahead for your ads so that you make the most out of your ad spend. Keep in mind that keyword bids can get more expensive during the competitive holiday season depending on your niche. This means that you will need to increase your daily budget and keyword bids to increase visibility and stay competitive.
Pro Tip: A simple strategy you can use to maximize your ads spend is to keep your daily ad budget to a minimum of $1 throughout the day THEN boost it up later during these two periods:
- 9am – 12pm PST
- 7pm – 9pm PST
Sales peaked during those two periods during cyber five weekend and you want to capitalize on that. Main reason behind keeping the daily ad budget at a minimum of $1 is to keep the Amazon A10 algorithm on the move and collecting data. Similar to driving, when you hit the brakes and then accelerate again, the algorithm has to restart and build the momentum once more (collecting data).
Should you have any questions regarding Amazon advertising, fill in the contact form and we will get back to you in no time.
