How to Run TikTok Ads in 2024 to Generate Sales for Your Shopify and Amazon Storefront TW
TikTok had 1.2 billion monthly active users in Q4 2021 and is expected to reach 1.8 billion by the end of 2022. This is where the opportunity comes in for brands looking to grow their audiences, increase ROI through ad campaigns, and ultimately increase their sales and profits.
For those of you brand owners or sellers interested in running TikTok ads, this is the only blog post you need to learn and be successful with running TikTok ads.
One important note before we proceed, below is the percentage of U.S.-based TikTok users by age:
- Age 10-19 – 32.5%
- Age 20-29 – 29.5%
- Age 30-39 – 16.4%
- Age 40-49 – 13.9%
- Age 50+ – 7.1%
Depending on the type of products you are selling, you might want to consider the demographics on TikTok. For instance, if you are selling bed rails for seniors, then it’s probably not a good idea to spend a huge investment in running TikTok ads.
TikTok for Shopify
To run TikTok ads, you first need to download and connect the TikTok app to your Shopify storefront then create a business account. We will guide you through the entire process step by step here in this article so have your pen and paper ready to take notes.For Amazon sellers who want to drive TikTok ads to your product listings or storefront, skip this section and go to TikTok Ads Manager.
Step 1 – Download the TikTok app on Shopify
Navigate to your Apps page on Shopify and search for TikTok and it will be the first one that pops up.
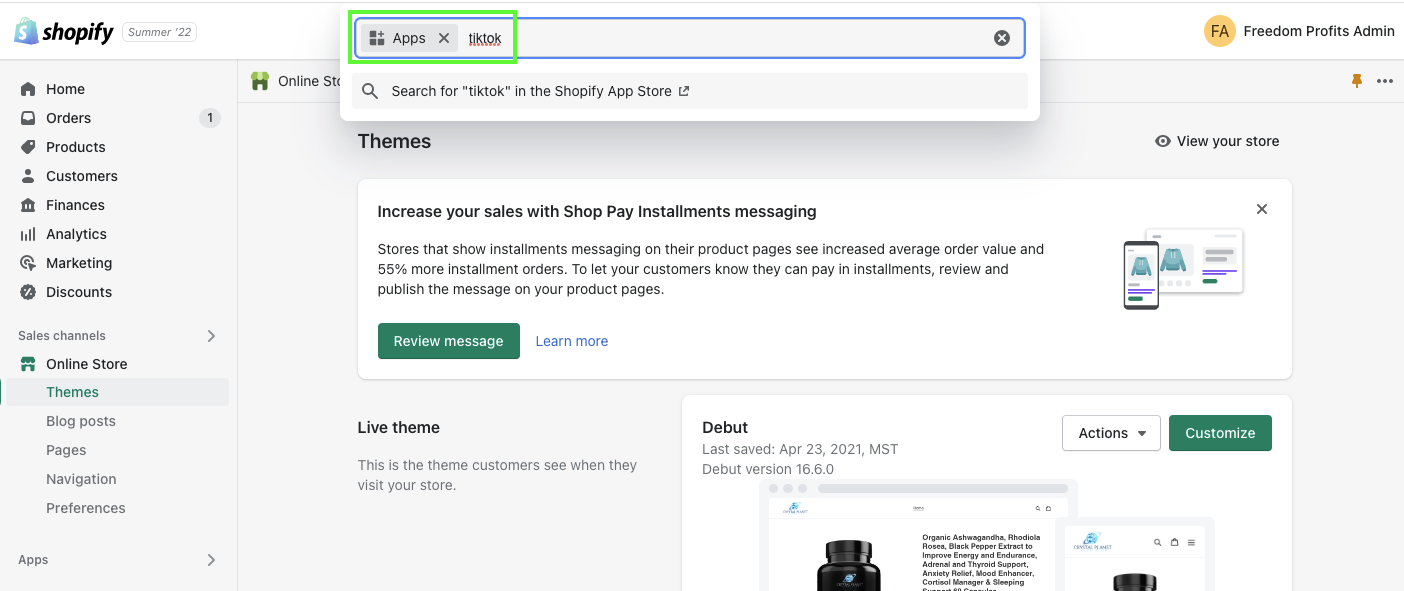
Once you have found it, click on the “Add app” button as shown in the screenshot below.
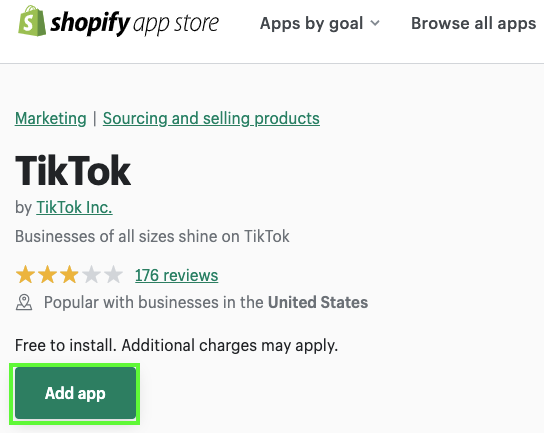
Once you have checked and confirmed the details of your storefront are correct, go ahead and add TikTok as a new sales channel.
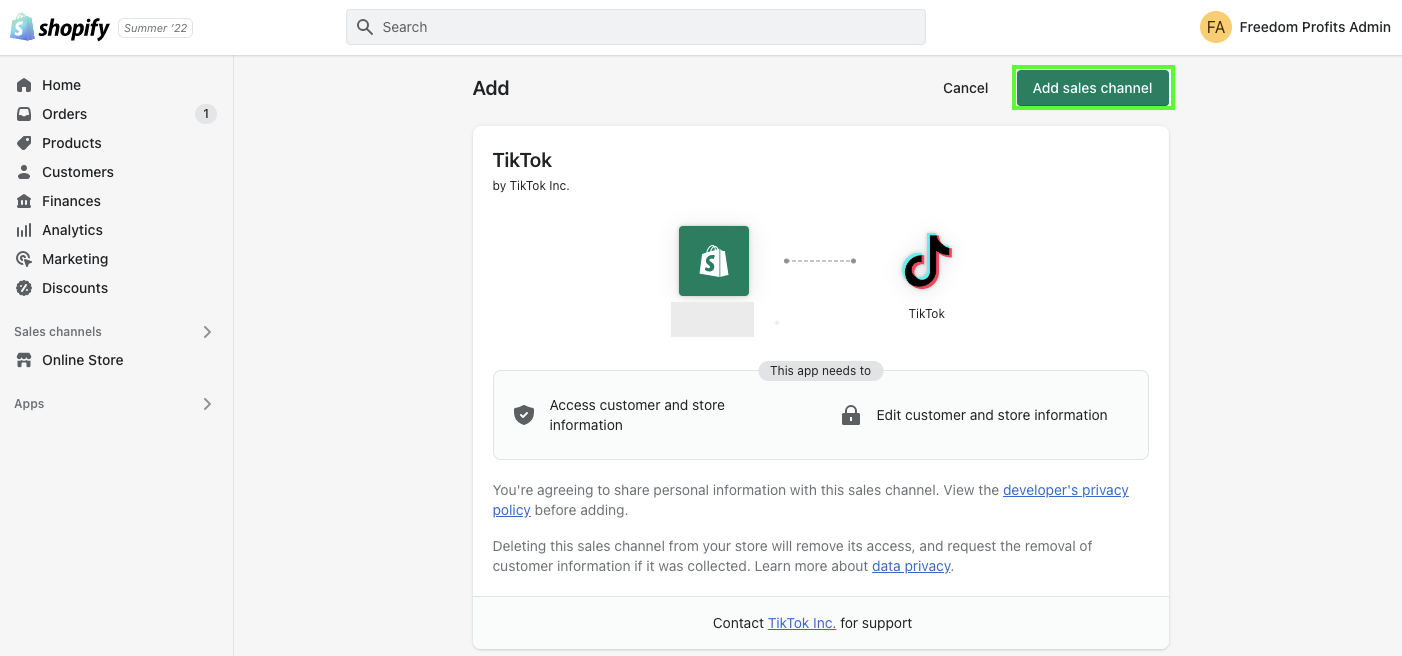
Step 2 – Set Up TikTok Account
Once you have installed the TikTok app, you should see the app shown in your left panel. If you have yet to set up a TikTok business account, now is the time to do so.
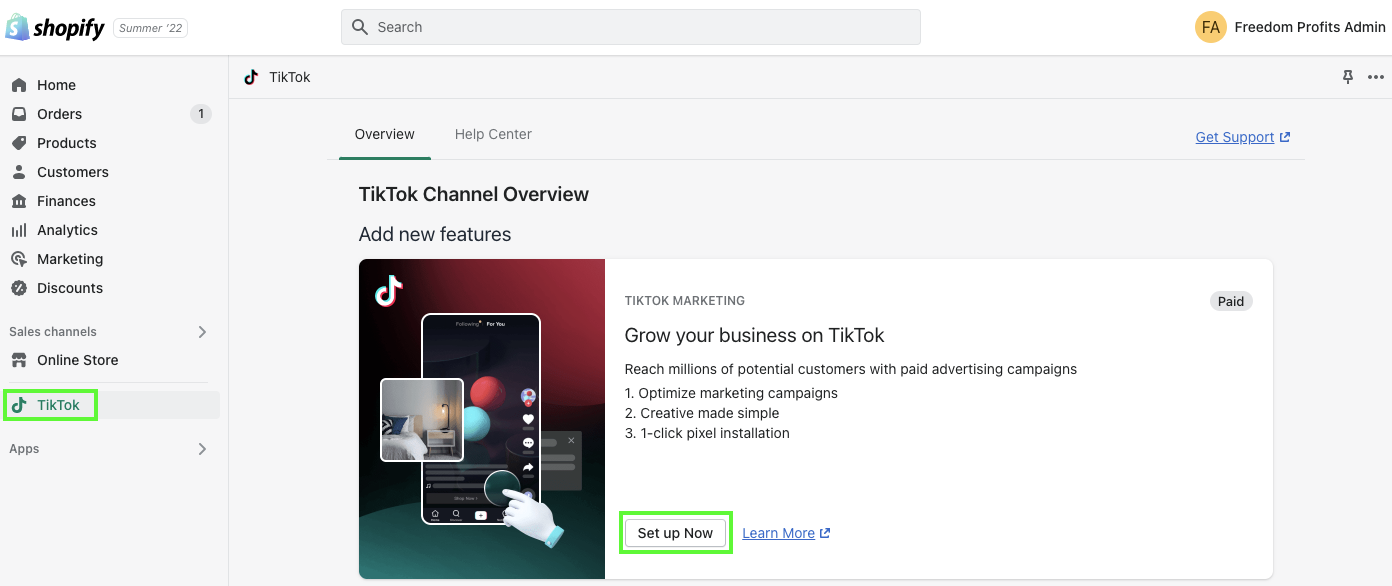
Click the “Set up Now” button and you will be taken to the page as shown in the screenshot below. Note that if you already have a TikTok business account, you only need to connect it and there’s no need to create a new account.
If you don’t, click on the Create New text in the top right corner. It only takes you a few minutes to create a new account and a few hours or days for your account to be approved.
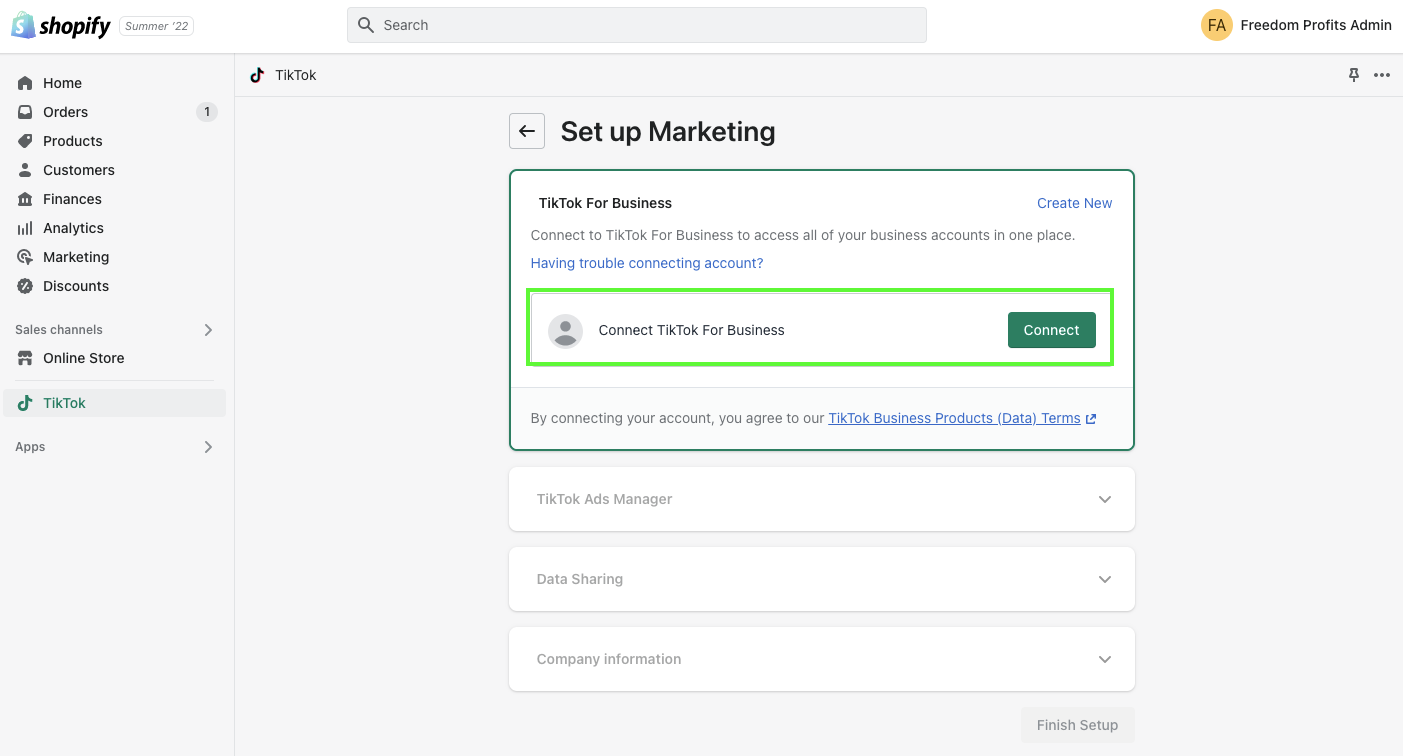
Follow the instructions on the screen and connect the TikTok business to your Shopify storefront.
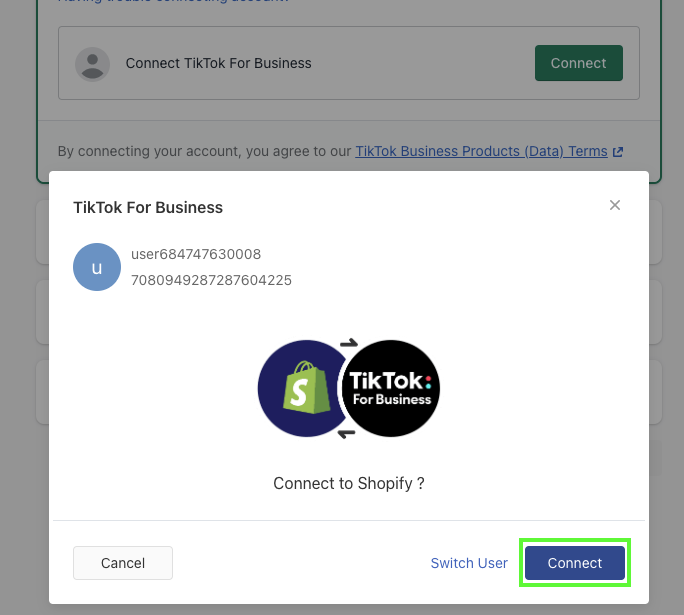
Once you have connected Shopify and TikTok, your business account name and ID will be prompted for your confirmation so go ahead and click “Connect”.
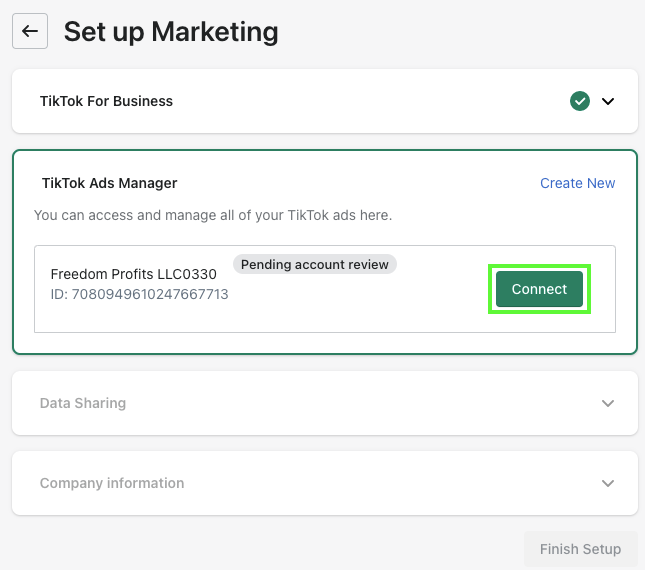
For the data sharing section, select the Enhanced targeting option for advanced matching, which shares personal information about customers, including email and phone numbers. The advanced matching pixel also shares customer browsing behavior on your online store. Select “Confirm” and proceed to the next section.
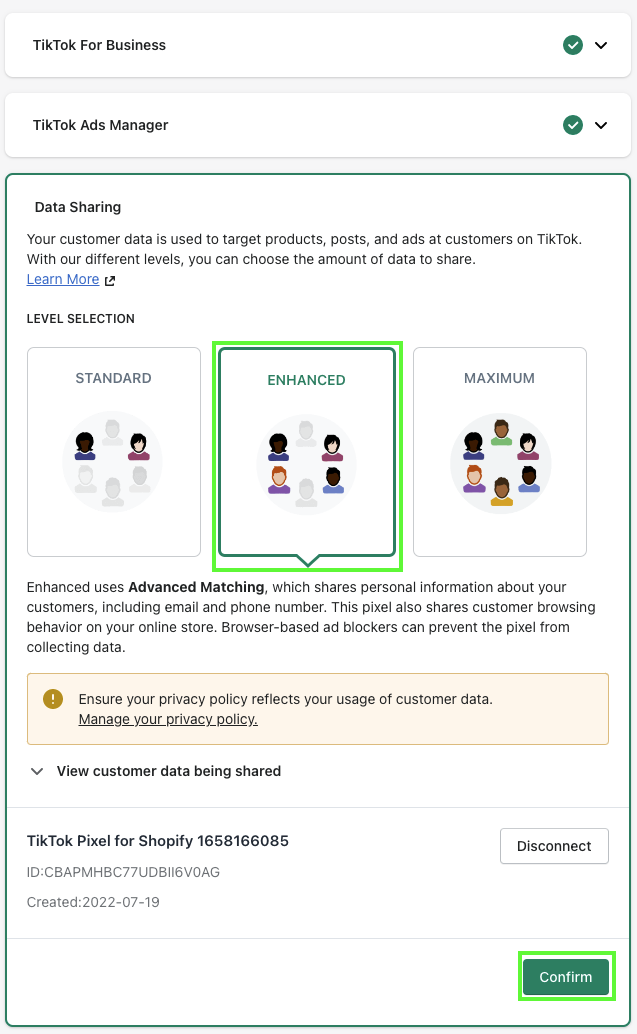
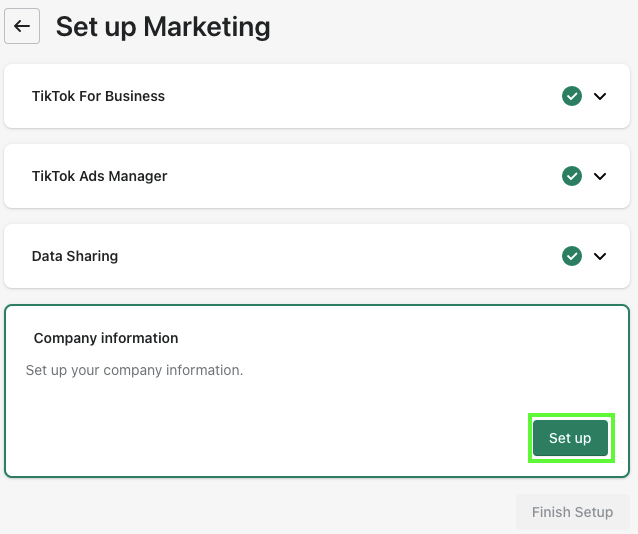
In this section, enter your company info to finish setting up your TikTok account.
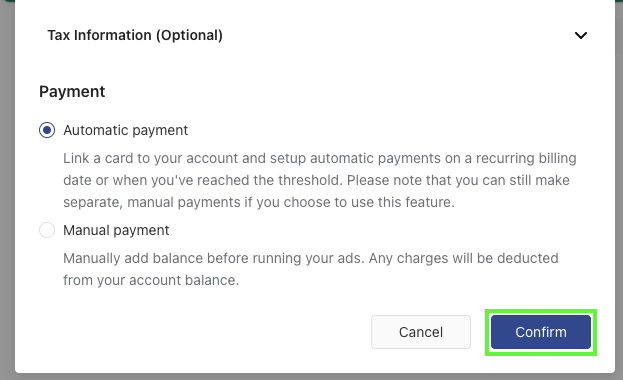
Tax information is optional but if you have it, do include it for tax and billing purposes. As for the payment type, we are going for Automatic payment instead of Manual for convenience and efficiency.
Step 3 – Confirm and Finish Setup
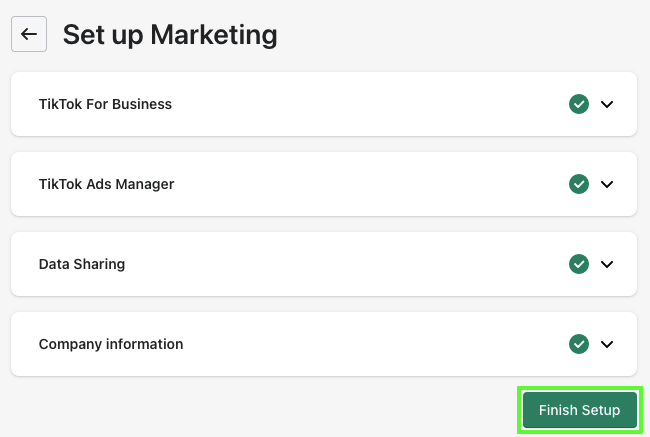
Once you have entered your company details and selected the payment type and tax information, you can quickly double-check to ensure all information entered are correct.
Click the “Finish Setup” button and you are ready to create your TikTok ads. Pretty straightforward isn’t it?
TikTok Ads Manager
Now that you have connected your Shopify store to the TikTok app, let’s dive into creating ads with the TikTok ads manager. Below is a step-by-step guide to creating your first ad campaign.
Step 1 – Select Ads Manager Mode
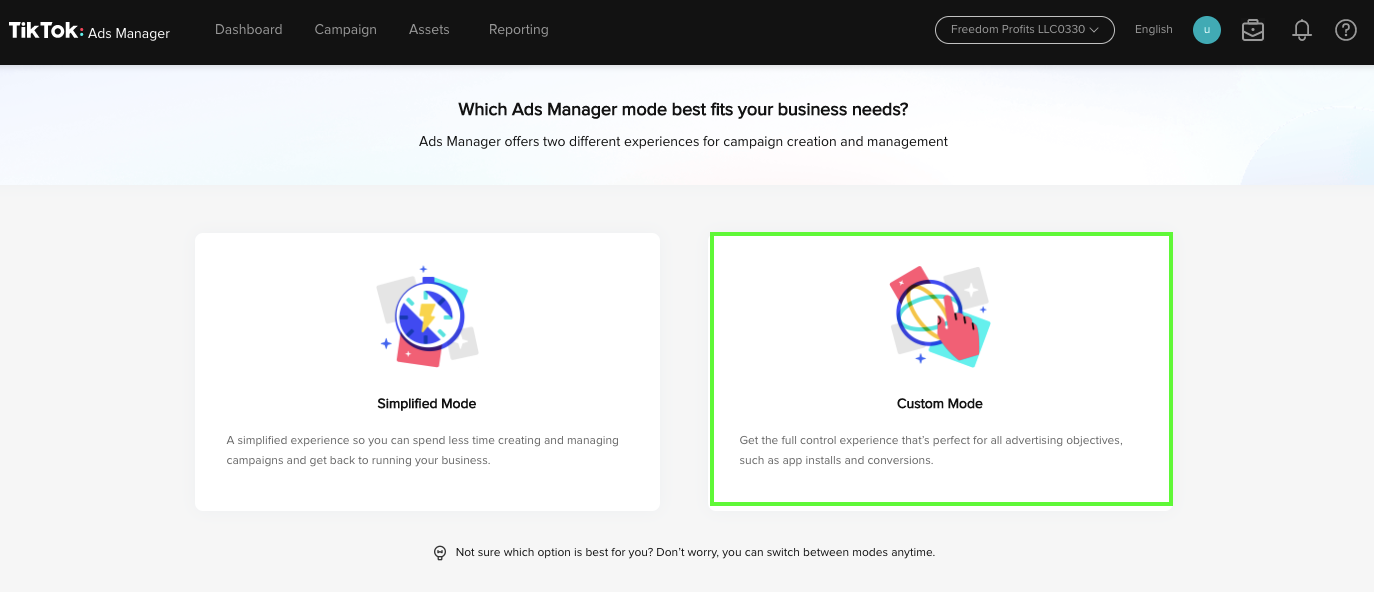
First, select Custom Mode so you have more control and get to customize your targeting options such as conversions and app installs shown in the screenshot below.
Step 2 – Create Campaign & Ad Group
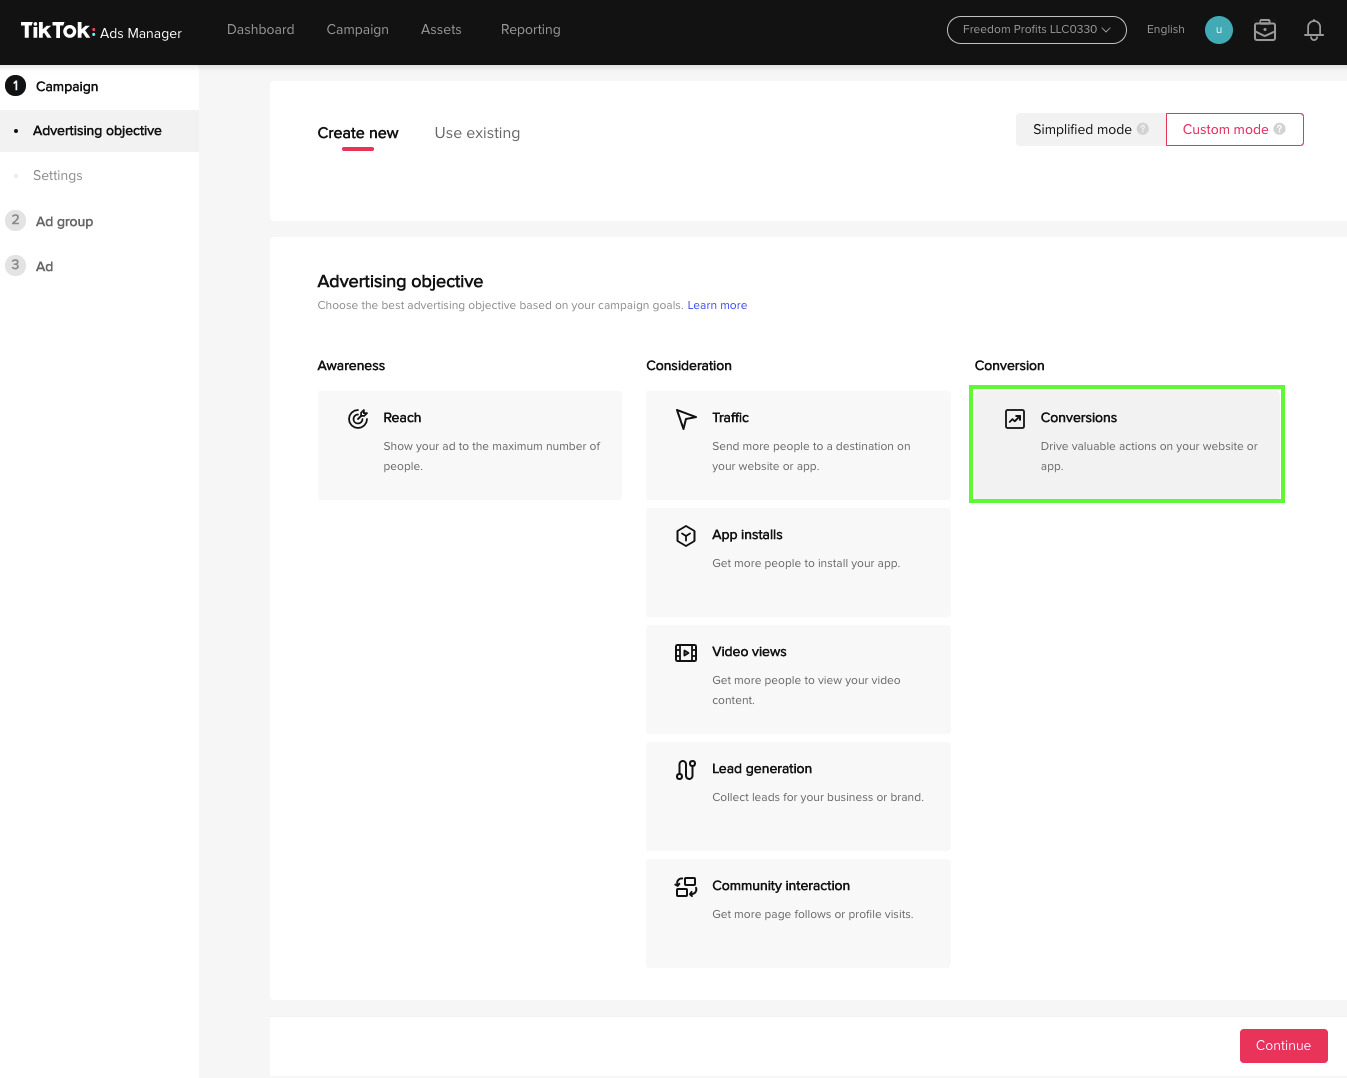
For your advertising objectives, you can choose from 7 objectives (Reach, traffic, app installs, video views, lead generation, community interaction, and conversions) depending on your advertising goal.
In our case, you’d want to generate sales and profits from TikTok ads so let’s select Conversions and continue to the next step.
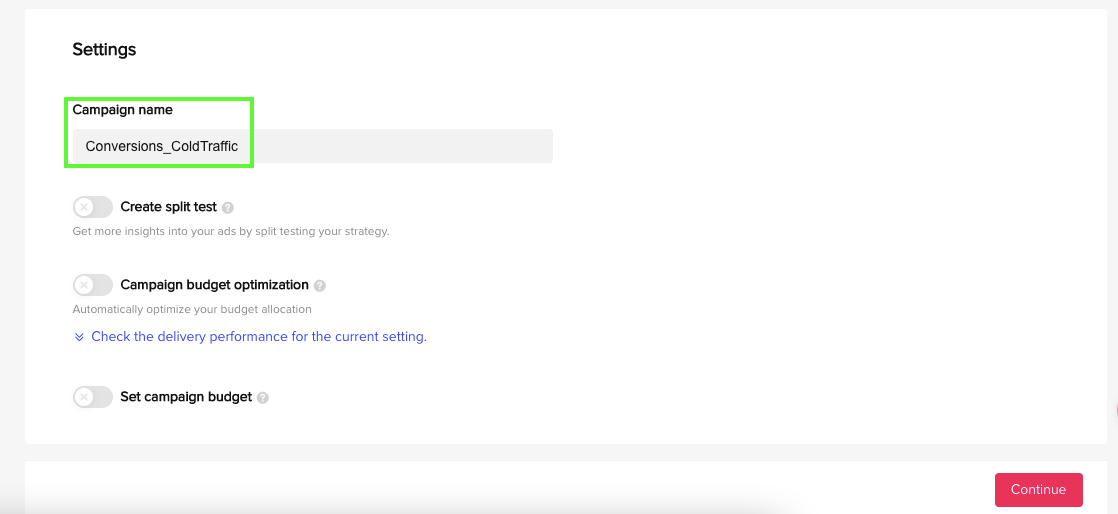
In the Settings, remember to use a naming convention to name your Campaign name. You’d want to be specific and enter the type of campaign, type of audience, and budget if you are planning to set any.
Once you have created your campaign, let’s move on to creating your ad group. Similar to naming your campaign, use a naming convention for your ad group too, and be specific with it so you can easily find and track your ads.
Step 3 – Promotion Type
Select Website as you are driving customers to either your Shopify or Amazon storefront.
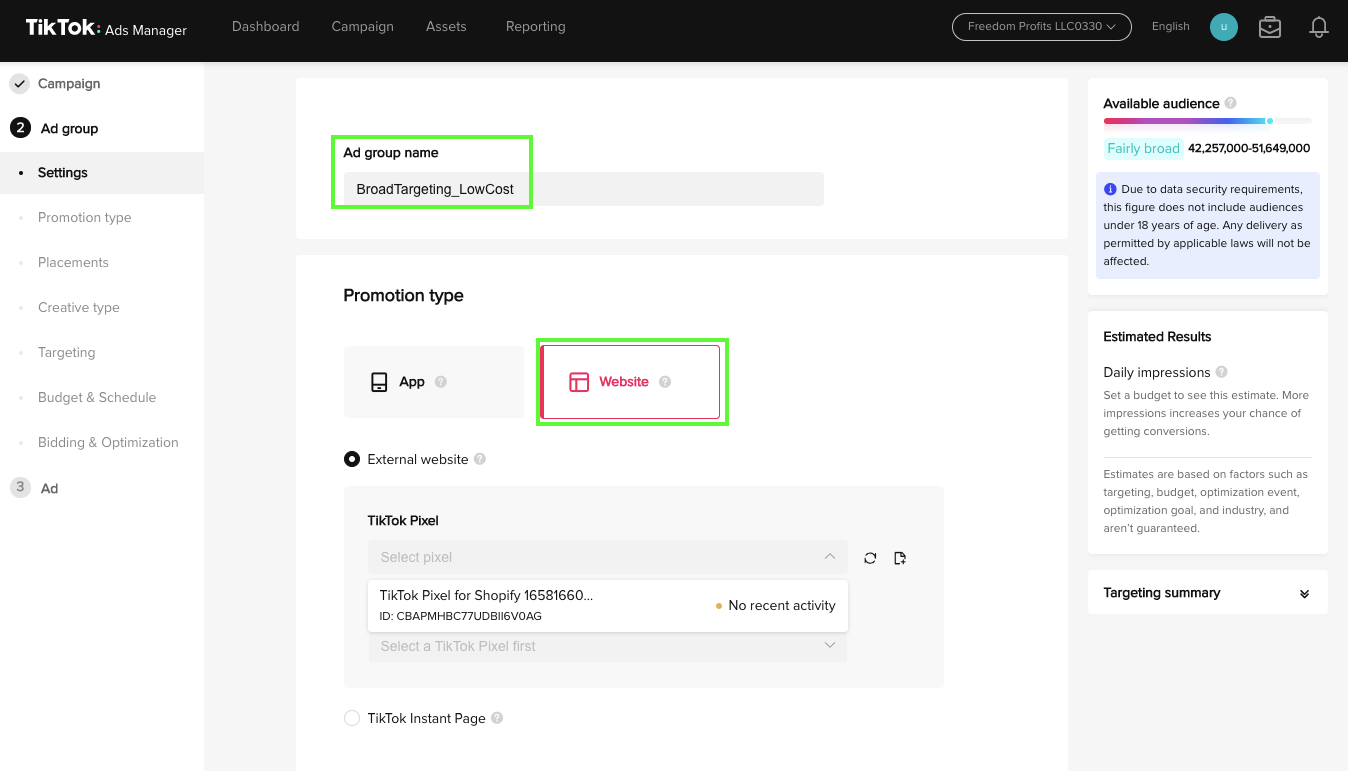
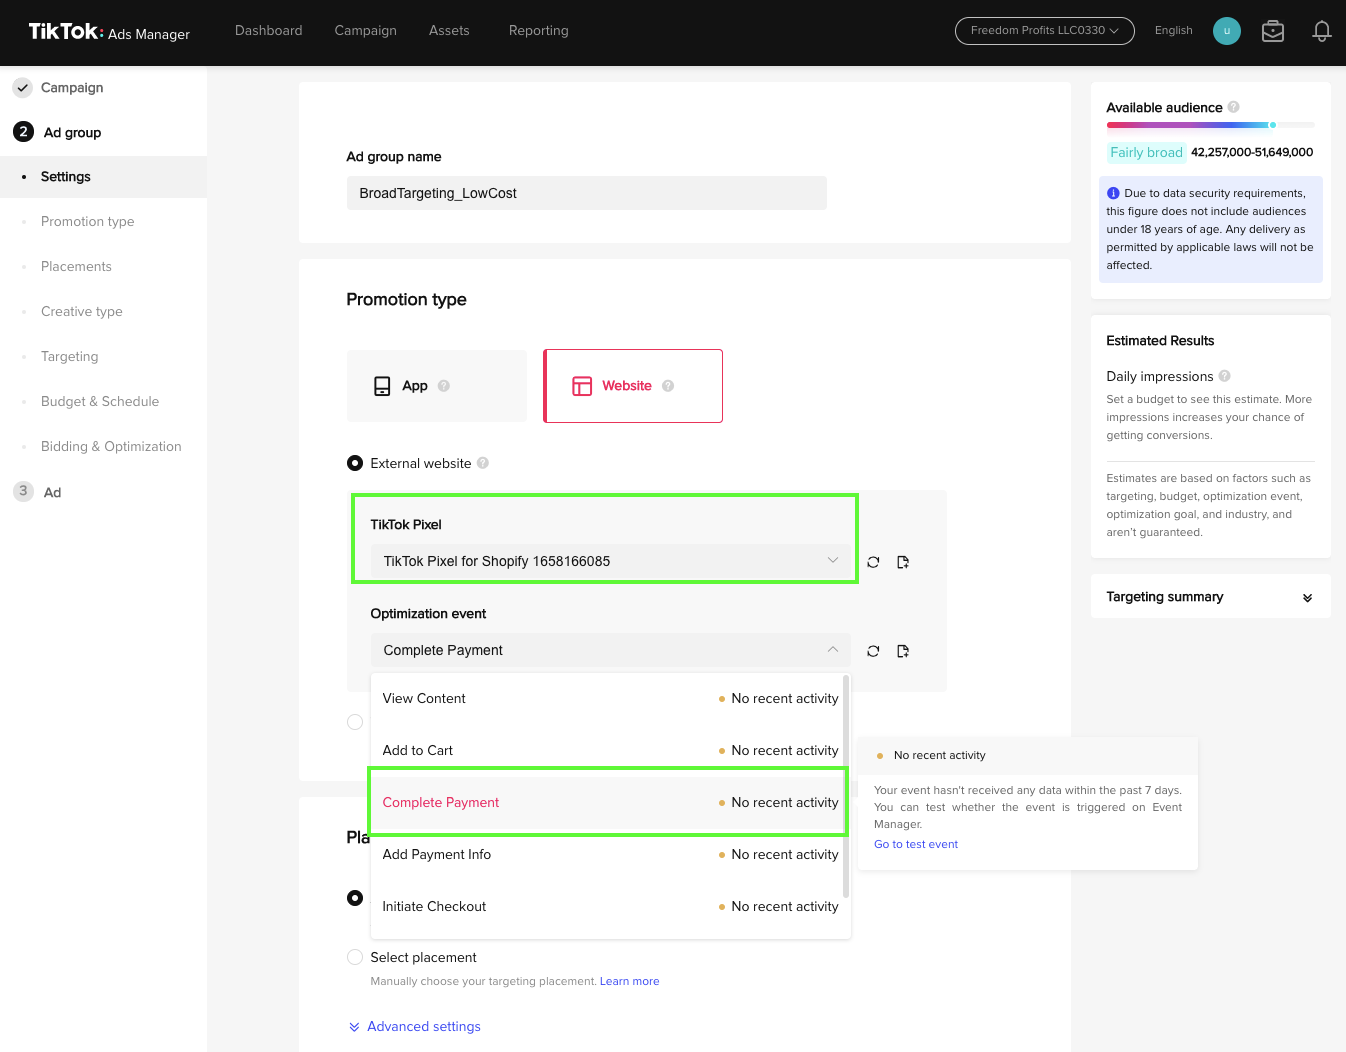
Note that the current TikTok pixel is pointing towards our Shopify store as shown below. To install the pixel to Amazon, you need to use Amazon Attribution.
For the Optimization event, select Complete Payment as that is a metric you’d want to track for conversions. Add to Cart is great, however, as we all know customers may add products to the cart but may remove them whenever. So unless the “money is in the bank”, there is no sale!
Step 4 – Ad Placements
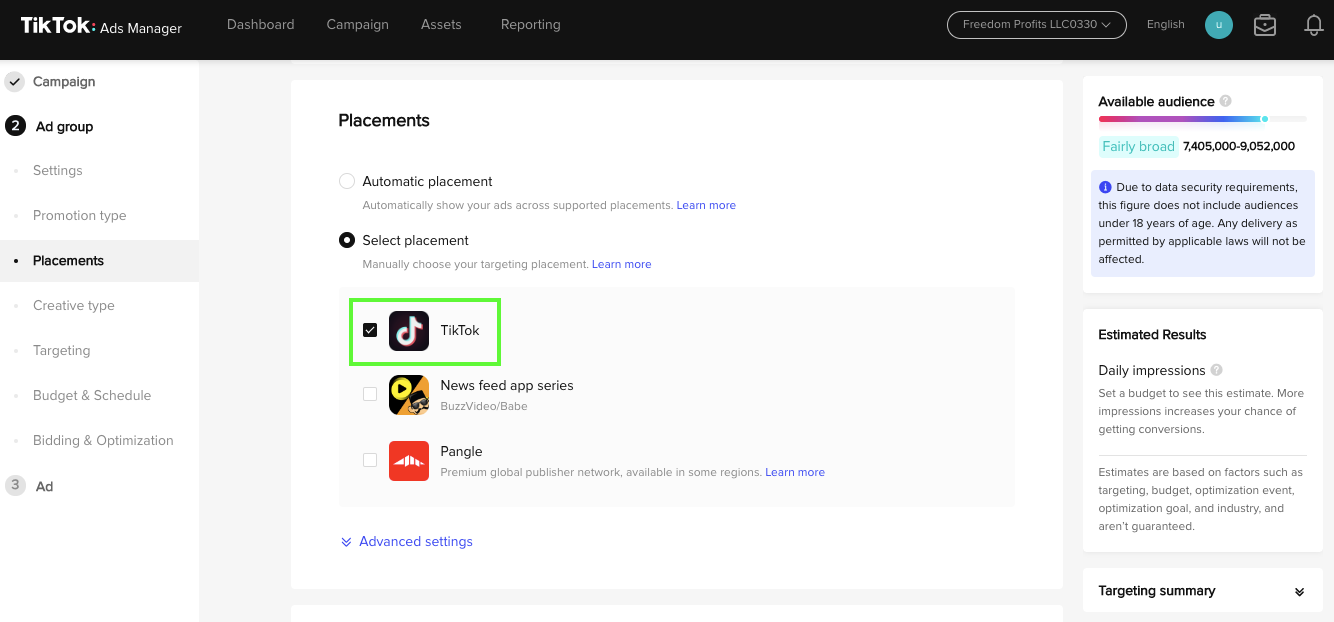
Next, remember to select ONLY the TikTok placement and remove both the News Feed App Series and Pangle. Automatic placement is good, however, with less control, your ad budget will be drained really fast by the algorithm.
Step 5 – Audience Targeting
For targeting, remember to be a pro and select Custom Targeting. Similar to Facebook ads, if you choose Automatic Targeting, your targeting won’t be specific and the algorithm will show your ads to an irrelevant audience.
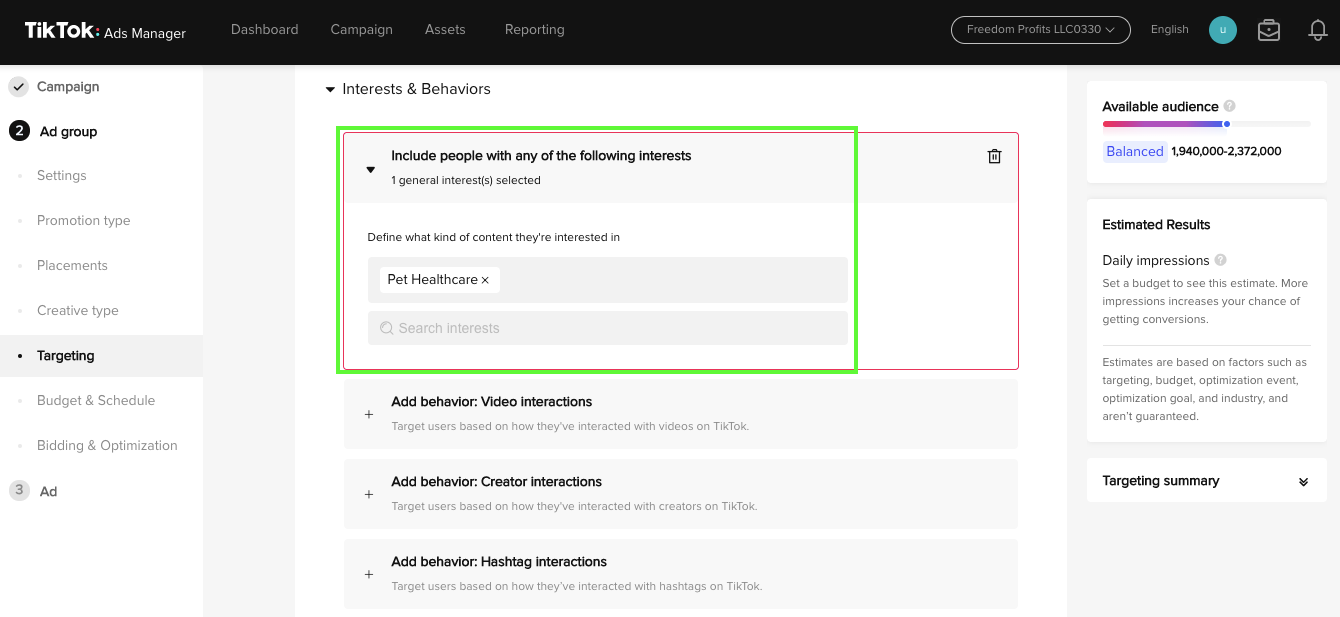
You have to know your target audience (TA) well in order to complete the demographic details as accurately as possible. You need to know their location, languages they speak, gender, age group, and their interests & behaviors.
Ignore the demographics shown in the below screenshots as these are only for references, use your own TA.
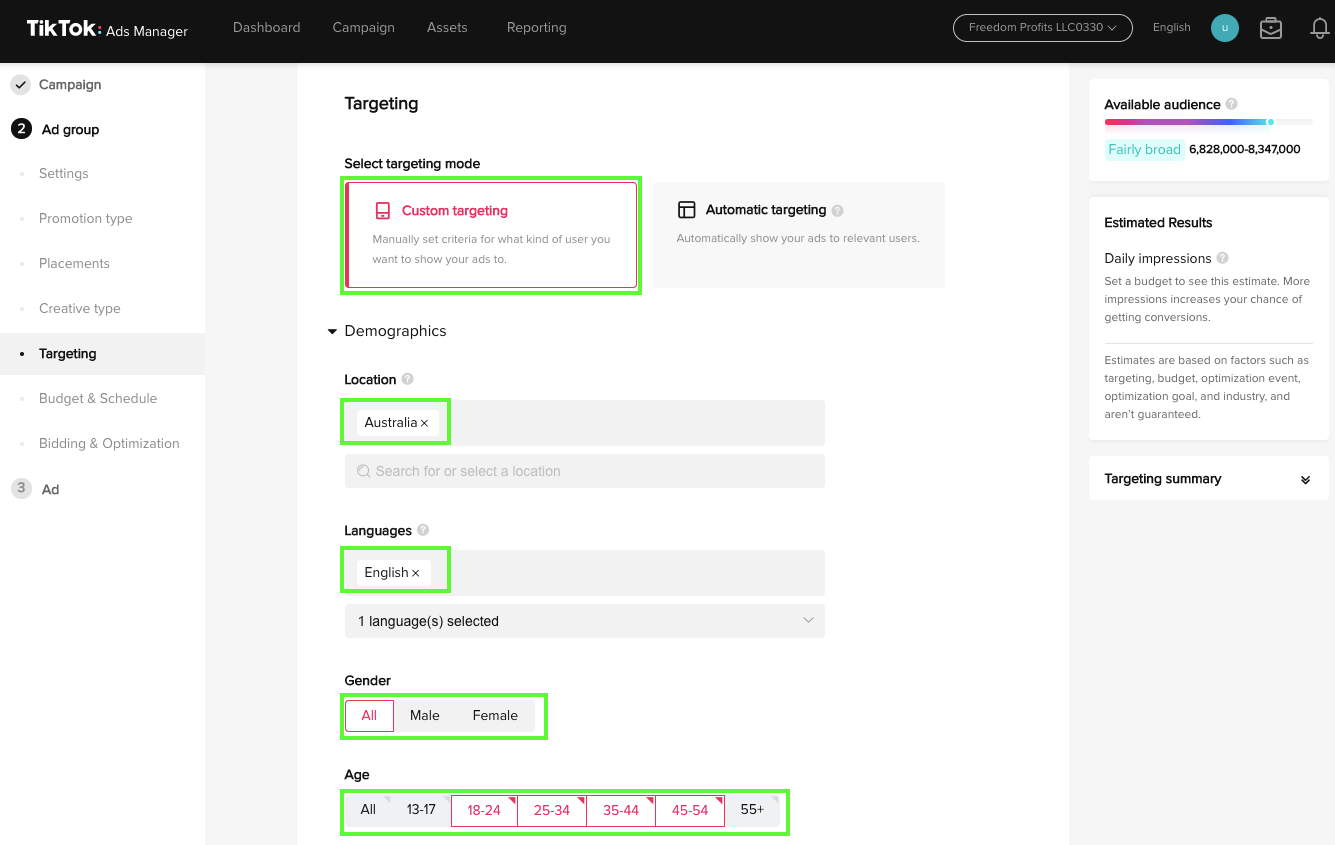
Similar to Facebook ads, the TikTok ads manager shows you the estimated available audience and estimated results in the right panel based on the demographics entered. Take this as a grain of salt and focus on being specific with your TA.
Step 6 – Budget, Schedule, & Bidding Optimization
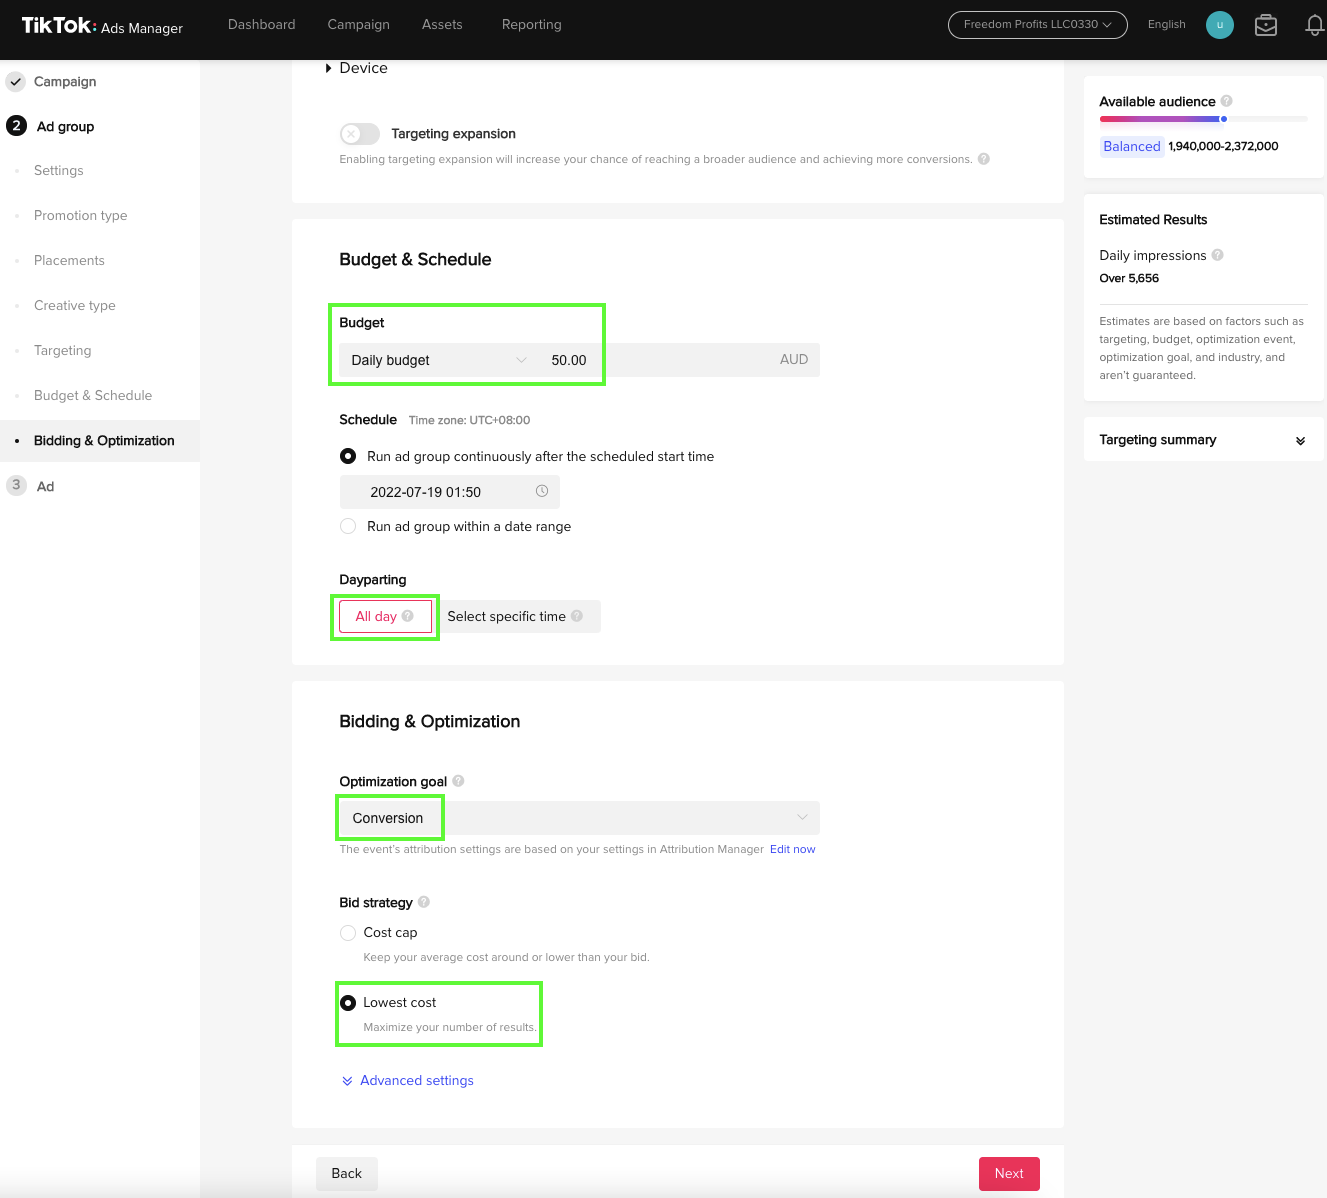
Once you have completed your audience targeting, the next section is to enter your budgeting details for your ads. In the below example, I am using $50 for my daily budget as that is a sweet spot for ads focusing on conversions.
For instance, if your CPA (Cost per acquisition) is $5 per product, then you would have 10 sales per day. You need to optimize your ads as they run and tweak your budget accordingly based on your CPA.
For the Schedule, select the Run ad group continuously after the scheduled start time. Then, select All day for Dayparting so your ads will run throughout the day collecting useful data along the way. Once you have enough data on specific times with the most conversions, you can optimize your ad group to only show ads during those times to maximize your budget.
Next, ensure Conversion is selected for the Optimization goal and choose the Lowest Cost option for your bidding strategy to maximize your number of results. The Cost cap option keeps your average cost around or lower than your bid and it is not as effective in my opinion.
This is similar to Amazon advertising’s dynamic bidding strategy where you’d want the algorithm to increase bids up to a certain % at the top of search and product pages should there be a possible sale.
Once you have completed the budgeting details, click “Next” and proceed to choose your ad creatives.
Step 7 – Ad Creatives
Ad creatives are vital to capture your audience’s attention and convert them into customers so you need to constantly A/B test them.
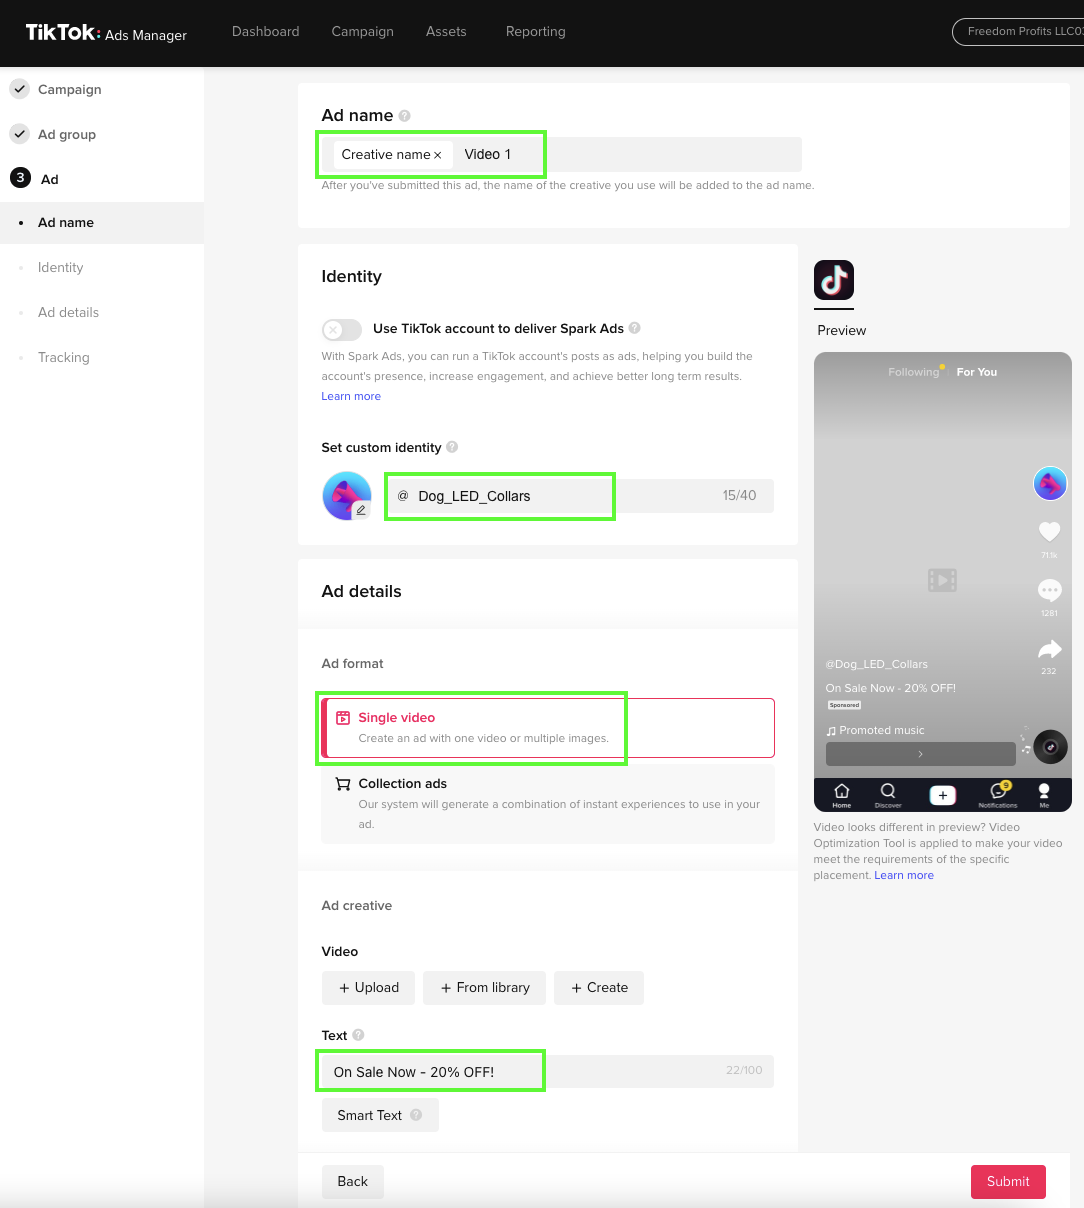
Again, use the proper naming convention for your Ad name. For instance, be specific about the type of image or video you are using (i.e. PromoVideo_DogLEDCollars_10sec).
In the Identity section, set a custom identity for your creatives. Use a customer search keyword as this will be shown in the bottom left corner of your ad and customer can relate to it. Choose a relevant image for the icon as well.
Then, select Single video in the ad details to use a video or multiple images you have created for the ad. Reels are highly recommended since that’s what TikTok is all about! HERE is a list of ad specifications for images and videos that you should follow to avoid getting rejected.
For your ad creative, you have the option to upload, choose from your library, or even create one on the spot. You could upload an existing video that has plenty of engagements or upload different types of videos to A/B test your campaign.
As for your ad copy, keep it simple with something along the lines of “On Sale Now – 20% Off!”. Keep in mind not to use too many characters (though the limit is 100) so the text isn’t taking up too much space and ended up blocking your video.
Step 8 – Ad Tracking
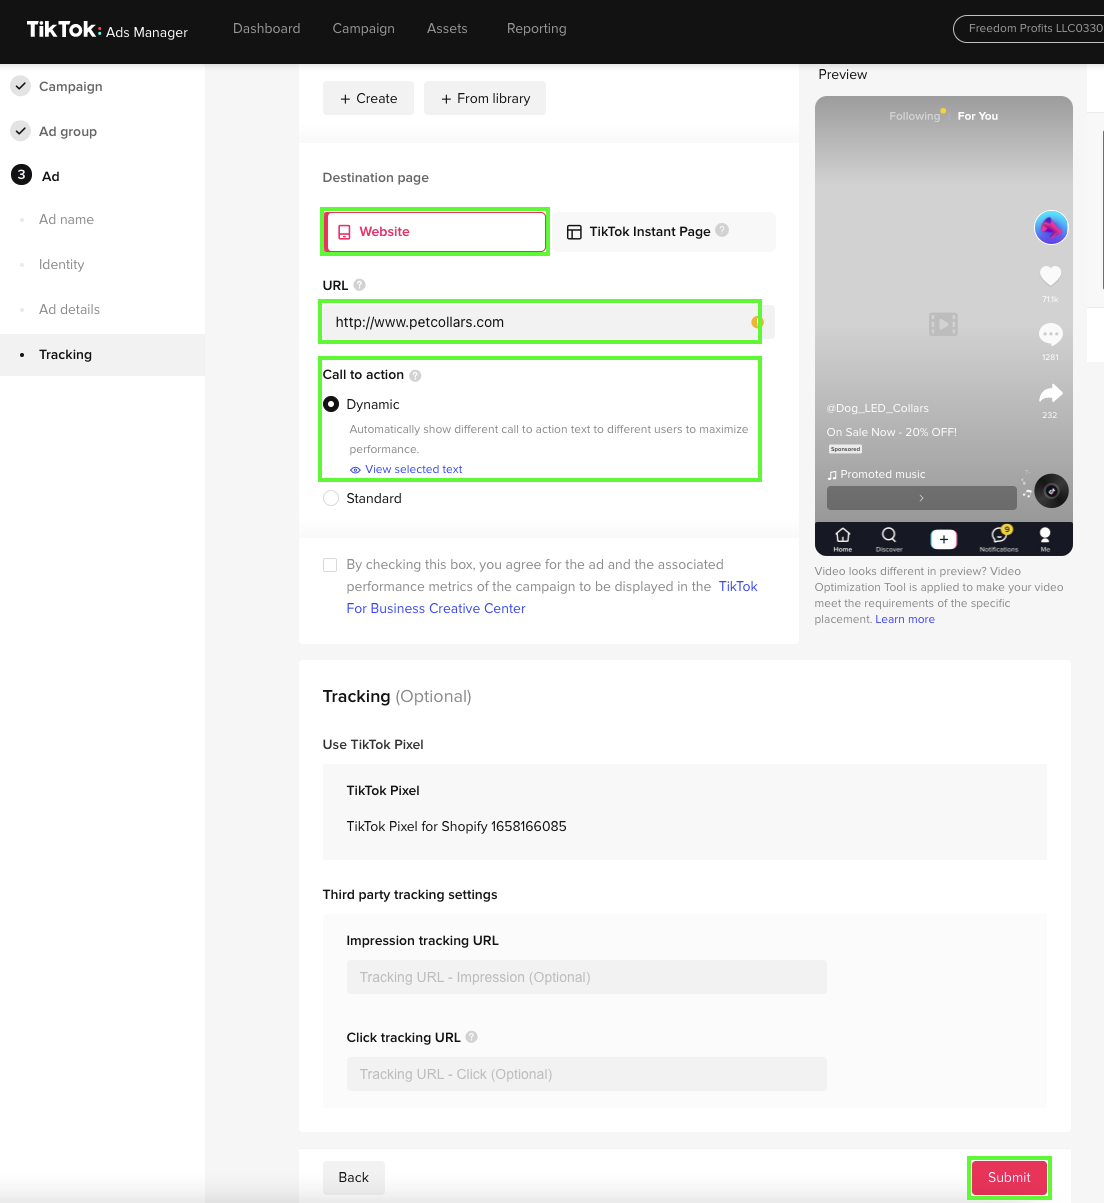
If you can’t measure it, you can’t improve it. You’d want to ensure that you have the correct pixel installed in your destination website whether it is Shopify or Amazon. Enter your Shopify website URL or the click-through URL from Amazon Attribution.
Then, select Dynamic for the Call to Action so your ads will automatically show different CTA text to different users and maximize performance.
Once you have completed all details for the campaign, click the “Submit” button and you are off to the races!
TikTok Ads Best Practices
Let’s go through a few TikTok ad best practices to increase your chances for successful ad campaigns.
Be Creative
Although you can run ads for up to 60 seconds, TikTok suggests you keep most ads under 15 seconds. Given the short timeframe and users’ short attention span, you’d want to use some fun creative elements to stand out in your reels.
A great tip is to search for video reels that went viral within your niche, consider why and how your TA would resonate, and apply these rules to your own video reels.
Test Different Targeting Options
You may not get it right the first time with your ad targeting but you can certainly tweak and optimize them with different targeting options.
Remember to tailor who sees your ads through demographics, geographic, and psychographic options offered by TikTok.
Keep Your CTAs Short and Simple
As mentioned above, you’d want to keep your CTAs short and simple not only to avoid the text from blocking the video but also to go straight to the point within the short timeframe. Your audience won’t be able to finish reading a long CTA during the timeframe plus they are busy watching your video.
Leverage on Spark Ads
If you noticed “TikTokers” enjoy using your products, then you should consider leveraging this UGC (user-generated content) as part of your ad campaign using Spark ads. Spark ads is a native ad format that enables you to leverage organic TikTok posts and their features in your advertising.
This saves you from having to create similar content so you can focus on other types of content. UGC is also a proof of concept that the video worked and is great for you to build a strong brand reputation.
Final Thoughts
If you are dealing with a lot of competitors on Amazon or want to maximize visibility, built your social media audience, and increase sales, then give TikTok ads a try. With the rising popularity of TikTok ads, it is important to be among the first to explore this option to grow your brand.
Don’t forget to use creative videos, keep your CTAs impactful, and be specific with your targeting to create winning TikTok ads.
